Creating a workstation is a process that requires proper configuration of various elements in order to obtain a fully functional working environment. The entire process should be carried out step by step, in the following order:
- Reason Groups
- Reasons
- Workstation
- Counter Catalog
- Counters
Following this order is crucial to ensure the process runs smoothly and allows for full workstation functionality.
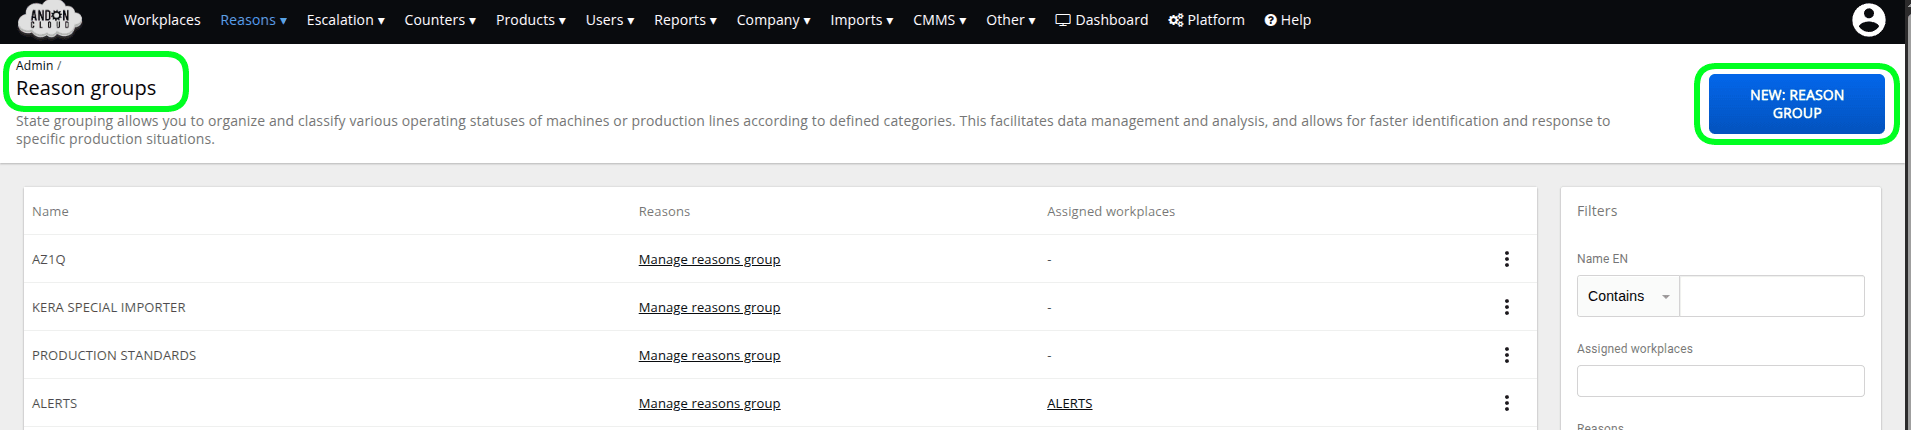
Reason Groups
- Please log in to the admin panel.
- In the "Reasons" tab, select the "Reason Groups" option.
- In the upper right corner, select the "Create: Reason Group" option.
- In the "Basic" tab, please fill in the Name field.
- Confirm the name by clicking: "Create: Reason Group."
Note: We will return to the Advanced tab after creating the reasons.
Reasons
Reasons are used to signal the current situation at a workstation — that is, to indicate whether production is running, whether there is a downtime, an operator break, or a breakdown. To begin, we suggest creating a few basic reasons. You will be able to expand this list according to your own needs. We recommend creating the following reasons:
- Running
- Planned Downtime
- Fault
- Breakdown
- Operator Break
To create Reasons, please:
- In the "Reasons" tab, open "Reason Groups."
- Locate the group you created and click "Manage Reasons."
- In the upper right corner, click "Create: Reason."
- Fill in the "Name" field and select the desired options (A–H) as needed

B) Required note. The operator will not be able to confirm the reason change without adding a note.
C) Change confirmation. To set this reason, the operator must additionally confirm the action to prevent accidental selection.
D) Ignore automatic reason change at shift end. If a reason has been set in the workstation options to activate at the end of a shift, and that reason is currently active, the workstation reason will not be changed to the one specified in its options.
E) Temporary reason. It will be replaced by the newly selected reason, and the operational time of both reasons will be combined.
F) Availability reason. Allows tracking of working time and downtime, supporting the evaluation of machine and personnel performance.
G) Color. A way of visualizing the operational state, where typically: green = running, yellow and red = downtime/critical situation, gray = machine off. It is recommended to keep this consistent with the "Availability reason" option.
H) Tags. Used to categorize reasons and classify the causes of unplanned downtime. This functionality is used exclusively in reports.
5. After selecting the appropriate options in the form, confirm by clicking "Create: Reason."
As mentioned above, you can broadly expand the list of reasons by creating "workstation reason trees." Example reasons for a workstation:
- Running (Production) – the machine is operating and actively used in the production process.
- Planned Downtime – the machine has been stopped according to schedule, e.g. for maintenance.
- Unplanned Downtime (Breakdown) – the machine has stopped due to an unexpected technical issue. The Breakdown reason can be further divided by type (e.g. mechanical, electrical, software, sensor-related, etc.) and by repair actions: a) acknowledgement, b) resolution, c) closure.
- Maintenance – the machine is undergoing servicing or routine maintenance.
- Waiting for Material – the machine is idle because it is waiting for raw materials to be delivered.
- Waiting for Operator – the machine is ready to run but awaiting operator intervention or presence.
- Testing – the machine is undergoing technical trials or quality tests.
- Standby – the machine is ready to operate but is not currently in use.
- Stopped – the machine is switched off and not in use, but without a breakdown.
- Changeover – the machine is being reconfigured, e.g. for a new type of production.
- Monitoring – the machine is being monitored by external systems to optimize performance or detect anomalies.
- Shutdown – the machine has been completely switched off for an extended period, e.g. at the end of a shift or production run.
Introducing detailed reasons will enable the operator to accurately identify a breakdown if one occurs, contributing to a quick response from maintenance staff and ultimately minimizing downtime.
Advanced Reason Group Options
- In the admin panel, select the "Reasons" tab, then the "Reason Groups" option.
- In the list of groups, locate the group you created and click the menu marked with three dots.
- Select the "Edit: Reason Group" option.
In the "Advanced" tab, you can assign the appropriate reasons to individual situations.
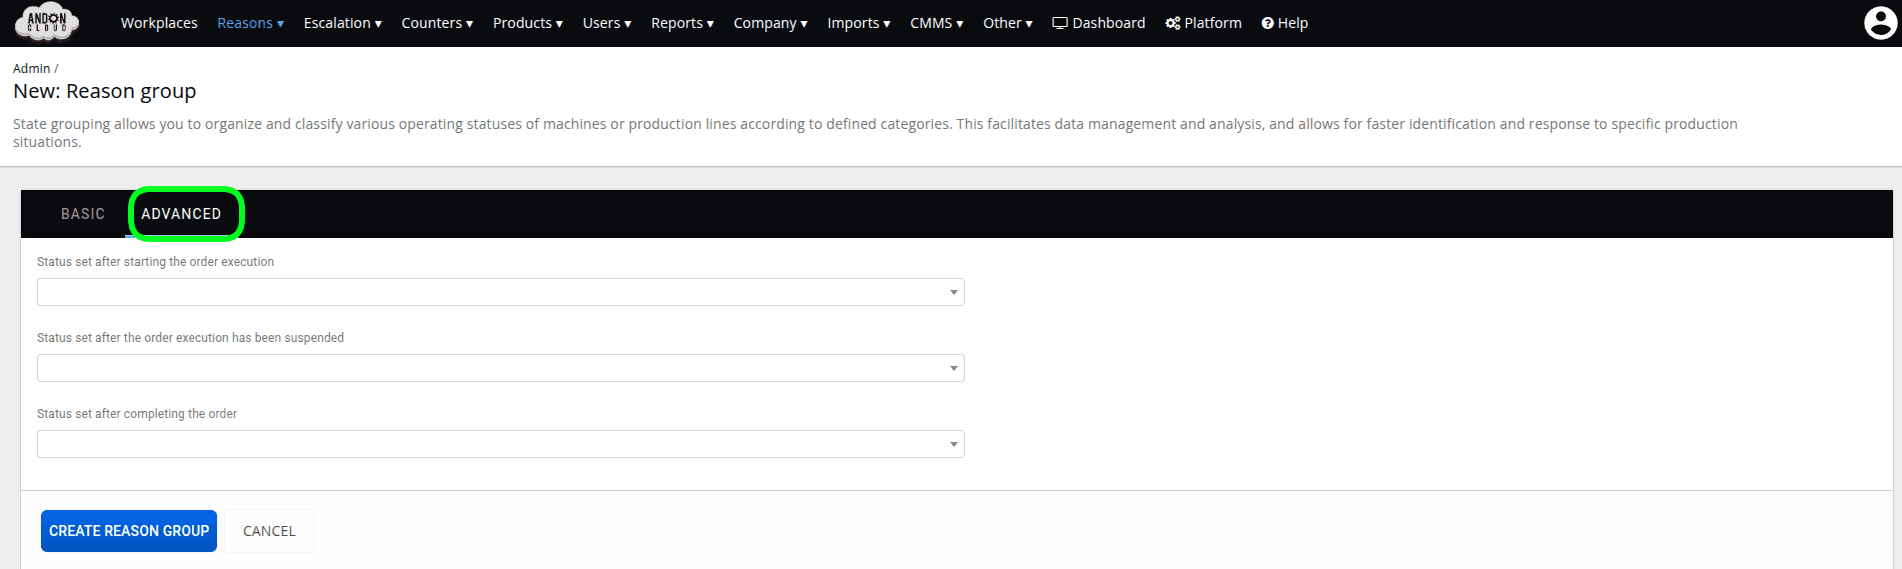
After selecting the appropriate reasons, click "Update: Reason Group."
Workstation
- In the admin panel, select the "Workstations" tab.
- In the upper right corner, click "Create: Workstation."
- In the "Basic" tab, fill in the "Name" field, then select the appropriate "Reason Group" and "Production Handling Mode."
Note: If at this stage you already know whether orders at this workstation will be entered via imports (planned) or entered manually/scanned (manual), please select the appropriate mode. A link to the import creation guide is provided here. If the decision will be made at a later time, please leave the default manual production handling mode.
At this stage, you can already create the workstation by clicking "CREATE: WORKSTATION," or continue configuring the account by proceeding to the next tabs.
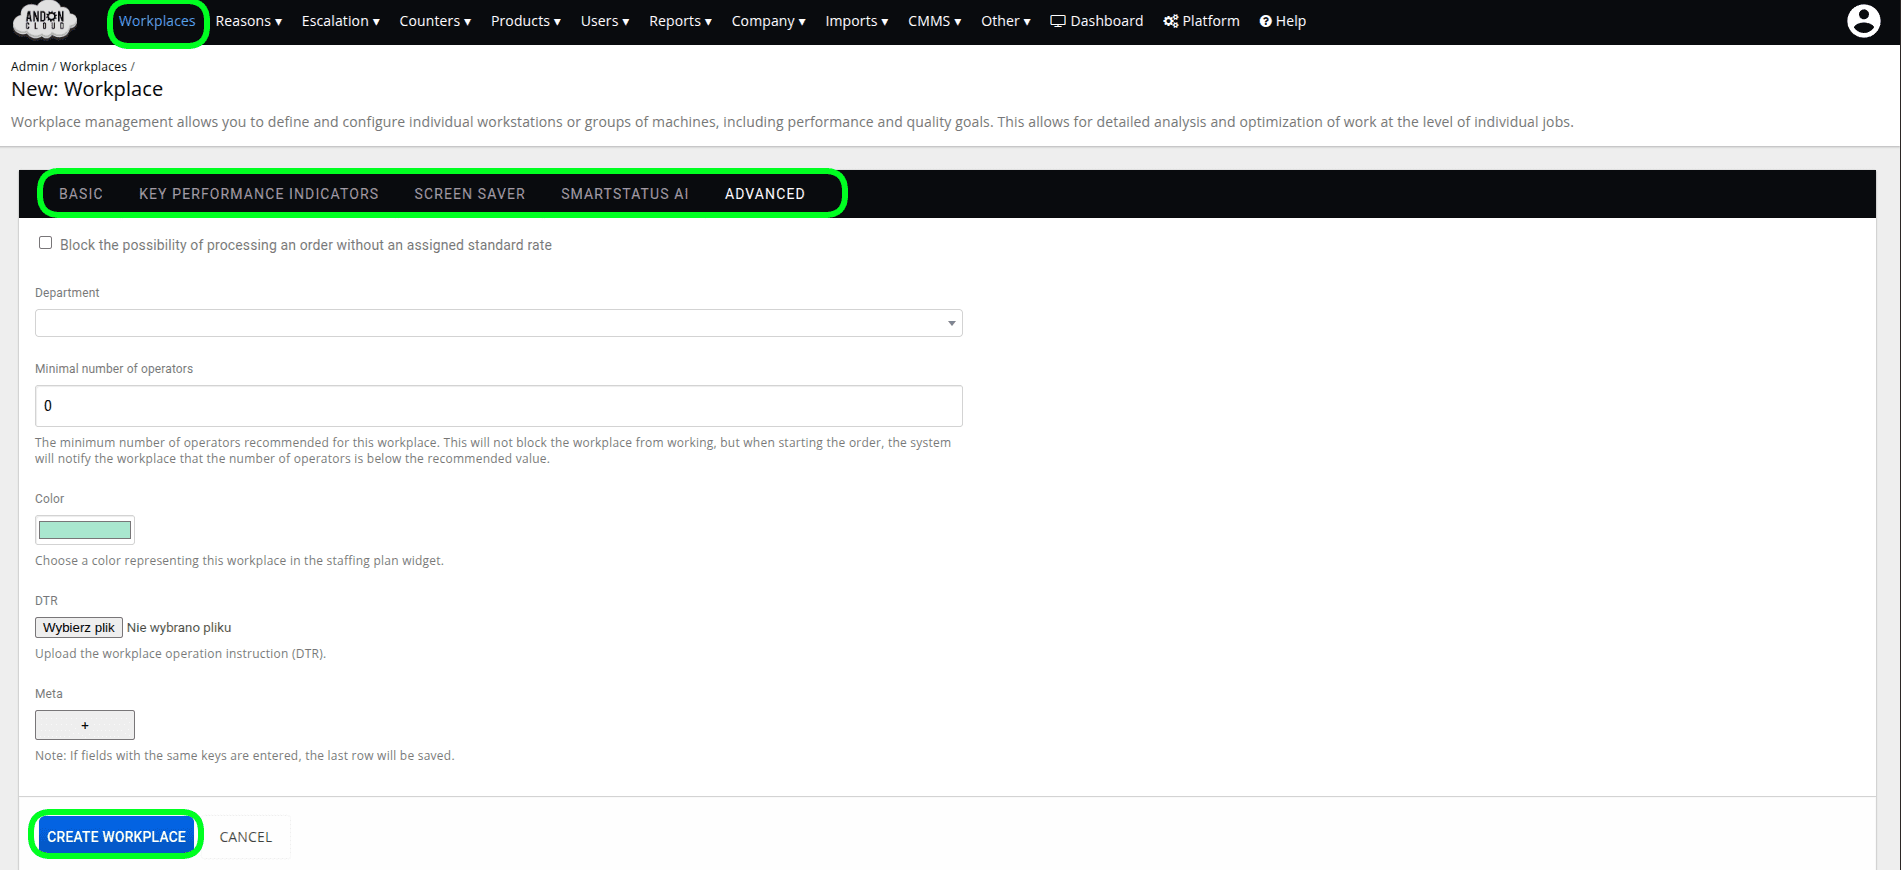
- In the next tab, you can set "Key Performance Indicators." However, these are not yet needed at the time of workstation creation. For detailed information on performance indicators, please contact the AndonCloud team.
- In the "Screen Saver" tab, at this stage you can only check the box: "Activate Screen Saver." Editing all variables will be possible after the workstation has been created.
- The next tab is SMARTSTATUS AI. This feature provides the ability to use reason recommendations suggested by artificial intelligence. In order for the AI to propose reasons, it must first collect information about the choices made by the operator. It is therefore worth enabling this option now, so that the system can begin collecting and analyzing usage patterns from the start.
- The last tab is ADVANCED. At this stage of workstation creation, no configuration is performed here.
- You can now click the "Create: Workstation" button.
The created workstation, together with the "Reason Group" you added, will be displayed in the workstation list.
Note! If you do not plan to use good parts and defect counters, you can begin processing orders in the operator panel, as the workstation is already ready in the system. Nevertheless, we encourage full workstation configuration, as it offers a range of possibilities and may encourage you to consider using counters in the future. A link to the counter creation and configuration guide is provided here.